Hey Y'all! I came up with the idea for my uncles Navy themed mini and box and it was pretty simple to do after I found the embellishments. Kinda hard sometimes to make something more plain when you are used to going all out with bling and flowers, but I managed to do it. So, i didn't wanna give my uncle a handmade and time thought out gift without doing the same for my aunt. I know one thing she loves is the Native American and Southwestern decor. I even got her a wall hanging one time that was just beautifully hand stitched with wolves. When I decided on this theme...I found out how HARD it is to find embellishments and stamps and even PAPER that matches this theme. I found a few things online and actually found a few sheets of paper at the same outlet that I got the Navy themed paper from. So, from there...that was my start to see what I could find that was kind of natural feeling and outdoorsy themed. I found one indian Chief stamp that I think I used 3 times in the mini. I didn't want to pay a lot for stamps because I knew I wouldn't be making one of these types again unless someone specifically asked for it. I had some horse stamps already because of my love of horses. So, those fit nicely as well. I printed a few images from online that I found of wolves and a totem pole. I pought a bunch of natural flowers from the dried section at Micheals and applied matte Modge Podge. I did this in hopes that it won't completely lose all the little pieces. I used a couple charms that I found on clearence at JoAnn and some brown Primas that I also got on clearence. I kept it VERY VERY simple. Not a whole lot of interaction on this one because neither my uncle or aunt are scrapbookers. I also made a box for this mini. The basic design and layout is almost exactly the same as the mini, but there's a larger heavier element on the top of the box. I found a really cool dream catcher ornament! I covered the sides with left over paper and modge podged over it. Added some animal fur looking trim from Hobby Lobby and topped it off with some more of the braided cord.
Here's the front of the mini
Here's the top of the box
Here's the slideshow with photos of the box and inside of the mini
Products Used
Olive pigment ink by Colorbox
Cigar box(from Susie visit her blog HERE)
Modge Podge
ATG
Red Line Tape
Eyelets
Twine - Natural
Burlap Ribbon by My Minds Eye
Buttons(JoAnn)
Dimensionals
Craft Cardstock
Paper House Productions Patterned Papers
Hot Glue
Bead Landing Charms(JoAnn)
Mini Grapevine Wreath
Feathers(Micheals & JoAnn)
Turquiose Ribbon(JoAnn)
Brown Ribbon(JoAnn)
Brown Fringed Trim(Hobby Lobby)
Mini Roses(Paper Wishes)
Corrugated Tattered Florals Die Cuts(From Renea visit her Etsy HERE her blog HERE)
Acetate
Braided leather cord(Hobby Lobby)
Indian Chief Stamp
Dream Catcher Sticker(The paper studio)
Inkadinkadoo Horse Stamp
Burgandy Cardstock
Dried Natrual Flowers
Recollections Flowers
Prima Flowers
Dream Catcher Ornament(Hobby Lobby)
Thanks for taking a look! I appreciate each and every one of you. :) Have a wonderful day!
Hey Y'all!! Today I wanted to share with you the altered Cigar box that I made for my uncles Navy Dog Tag Mini. I still have to add the closure, but I haven't made it to the store!! I wanted to give this to my uncle already, but I want it completed before I do. So, I'm holding it until then.
So...here it is!
The slide show is below for more photos of the inside and outside.
I started out with a paper covered cigar box. This was my first time to alter one of these. My GREAT friend Susie sent me 2 boxes to get my creativity going! Thank you so much Susie. You are really the BEST! I peeled off a lot of the paper because when I tried to cover with paper, you could still see the embossed paper underneath that the box was covered in. So...I painted with folk art Silver Metallic paint over the parts that would show. Then I found this GREAT paper from JoAnn's that was also a little bumpy. It kinda reminded me of waves? LOL!! Ok, maybe a stretch, but I liked it anyway and it's NAVY. :) So...I put that on the top. I used the large Navy emblem sticker from K&Company in the middle. I used pop dots to raise it off the box and put it on hammered silver texture paper by Hot of The Press. I also covered the sides with this paper and used screw head brads on the paper joints on the front of the box. I used mini spools for the legs on the box. I painted them a darker blue, but not navy. I didn't have any paint that color. I used rope in the corners and more stickers from K&Company(the stars) and I also backed these on the silver paper. I had already covered in the SILVER when I decided to use the K&Company stickers that were GOLD! LOL but I think it came out just fine. I still am not THAT thrilled with the end result...but no bling and flowers on something for a MAN! LOL I added the same hammered silver paper to the inside of the lid and added gray felt in the bottom.
Here's the products I used.
Cigar Box(courtesy Susie. Visit her blog HERE)
Navy K&Company Stickers
White Rope(JoAnn)
Hammered Paper by Hot Off The Press(I purchased at JoAnn)
Navy colored wavy paper? (I purchased at JoAnn)
Folk Art Metallic Silver paint
Wooden Spools
Screw Head Brads by The Paper Studio
ATG
Red Line Tape (purchased from Jody. Visit her HERE)
Dimensionals (purchased from Jody)
Gray Felt
Hey Y'all!! Keeping with the military theme...today I am sharing the mini that I have just completed for my uncle for Christmas. He was in the United States Navy and very proud of his service. I'm very proud of him too and greatful for his service. So, I wanted to collect the pictures from his Navy days that I have and put them in this mini for him. I really think he will enjoy it.
I first saw a dog tag mini created by Regan (EmoraDesigns) on youtube. Click HERE for a link to her video. She cut her mini out using the Stand and Salute Cricut Cartridge...me however, I cut mine out by hand. Didn't even think of using the cartridge until AFTER I cut it out by hand!! woo! My hand was hurting. I also do not have the deep cut blade for the Cricut. I cut out from chipboard, made my hole for the ball chain to slip through, painted the edges with blue folk art metallic paint, then I added my papers and embellishments. This was a challenge for me to do this mini. Not a WHOLE lot of embellishments you can use for Navy that I found. I didn't wanna use the same things over and over in the book, but some stuff I did have to repeat. I was lucky enough to find some of the Creative Imaginations Navy Themed paper line at a discount closeout store!! I paid 10Cents a sheet!! Can you believe it? I was so glad to find it. They did however only have 2 styles. Navy emblem and Navy words, so I basically used these through out the book. I also found the Jolee's Navy stickers. I must say these are my favorite out of all the Jolees Military themed stickers. So, a manly book...no bling or stickles or lace or flowers!!! WOW!! How does one do that? Well, I'm very happy with the way it turned out and I hope you enjoy the slideshow and will leave a comment or suggestions. I hope to have this completed for him by December 24 to give to him at our family gathering. Just have to finish up the box!
Here's the Front Cover - Kept this pretty simple...no frilly touches.
This page I have to give special credit to....
My friend Susie...visit her blog HERE ....suggested that I do a Shaker box like a Port hole....well, I didn't have any beads or microbeads, so I left this open to fill at a later date, or just to use as a frame. If she hadn't given me the idea I would have been stuck on this page! So, thank you Susie!! You are the best. :)
And here's the inside slide show:
Here's the supply list:
Navy colored cardstock
Navy Stickers from Jolees
Creative Imaginations Navy Signature Collection
Screw head brads by the Paper Studio
white puff paint
Gray pigment ink
White cardstock
White dimensional boosters from Jody(visit her store HERE)
Black Dimensional boosters from Jody(she has redline tape too!)
Modge Podge
Navy Bazzil Dots Paper
Star embossing folder by the Paper Studio
Rope trim from JoAnn
Twine
Blue Pigment Ink
Timeless Moments Navy Themed Stickers
Star Buttons
Anchor Buttons
Stand and Salute Cricut Cartridge
Chain
Star Brads
Acetate
Ball Chain
Creative Imaginations USN Themed Brads
Karen Foster Metal Tag Lines
Glossy Accents
K&Company Navy Theme Dimensional Stickers
Anchor Eyelets
Battleship Eyelets
Gray Cardstock
Navy Ribbon
Pioneer Metal Navy Emblem
EK Success Wave Edge Punch
Medium White Tags by the Paper Studio
Small Silver Eyelets
Star Shaped Paper Clip
White Round Velcro
Extra Large Eyelets(from the sewing section)
Hey Y'all! Well, again, I'm so far behind in posting. I think I get one project complete then 2 more get added to my list! WHEW!
So, if you have visited me before then you know how much of a supporter I am of our United States Military. :) I just completed these books for the Wounded Warrior Project. This was started by Karen Petersen on the {scrap}beach. I warn you to be careful where you send items to if you are trying to get something(cards, care packages etc) to a service member. There have been lots of BAD addresses floating around out there and the items will just be thrown away. There are several places you can send cards and I will list them below, but this was the first time I had ever been able to make a mini to send in. I was so glad to get in contact with Karen for this project.
I kept it pretty simple since these will be going to people who may not be crafters. I went with a Holiday Theme and this was my first Christmas Mini. I have to say it was a CHALLENGE not to make it so busy and chunky like my others! I ALWAYS struggle with my covers on the minis. This one...i'm still not that happy with, but I had to get these in the mail. So, just had to put it down!
Here's a photo of the front of the book. I made basically 2 just a like(first time for me)
And here's the slide show of the inside.
Products used
Bo Bunny Father Christmas 6x6 Paper Pad
K&Co Christmas Tag Pad
Handmade Mulberry paper trees
Jolees Bells
Making Memories Glittered Brads
Glossy Accents
Acetate
Making Memories Gold Paint
Folk Art Christmas Green Metallic Paint
Harmonie Chipboard Reindeer
Prima Flowers
K&Co Star and Snowflake Embellishments
Recollections Bling
Christmas Red Stickles
Paper Studio Binder Rings
Tulle
Making Memories Lace
Making Memories Trim
Pearls
Pearl Teardrop Trim
Aunthentic Stamp Die Cuts
Recollections Pearl Flourishes
Recollections Buttons
Prima Flowers and Leaves
Rock Candy Distress Crackle
Matte Modge Podge
Garment Pins
Clear Beads
Snowflake die cuts
micro beads
Making Memories Red Glittered Trim(topped this with glossy accents)
Websters Pages Sparklers
Small Key Charm
Kanban Christmas Die cuts
Pleated trim
So, there's the list. If you'd like to make cards for a service member or get involved in supporting them in anyway...please visit Operation Write Home or Soldiers Angels
You'd be surprised how much a small and inexpensive gesture can mean to a total stranger!! You might even make a friend and who can't use a friend? :)
So, I'm way behind on posting, but today I thought I'd share a store liquidation sale today.
ScrapAttackScrapbooking.com was one of the first places I ordered from online when I started to branch out in my scrapping. I discovered brands like Bo Bunny, Prima, Ranger, Fancy Pants, Moxxie and all the other brands it's hard to locate in the larger crafts stores. It was amazing shopping there.
Unfortunately, the online store is now being liquidated. So, thought I'd share the site with you and you can hop over and get 40% off!! Visit Scrap Attack Scrapbooking. The code to be used is on the first page when you get there. There's still some great stuff in the online store.
I am almost done with 2 mini's I've been working on. I can't wait to post those up!
Until then...I hope you have a great THANKSGIVING!(if you celebrate it)
My friend Monica(Scrappin4MyBoys on the{scrap}beach) told me about a great idea her and a couple of the other girls there had. They wanted to do 6X6 mini pages with all of our info on it to swap. You'd add your email, youtube, blog, address, etsy, ebay etc. to the back of your page so it's at easy reach for your friends when they need to contact you. I thought it was a wonderful idea...so I asked some of my friends to swap with me as well.
Here's what I made for them.
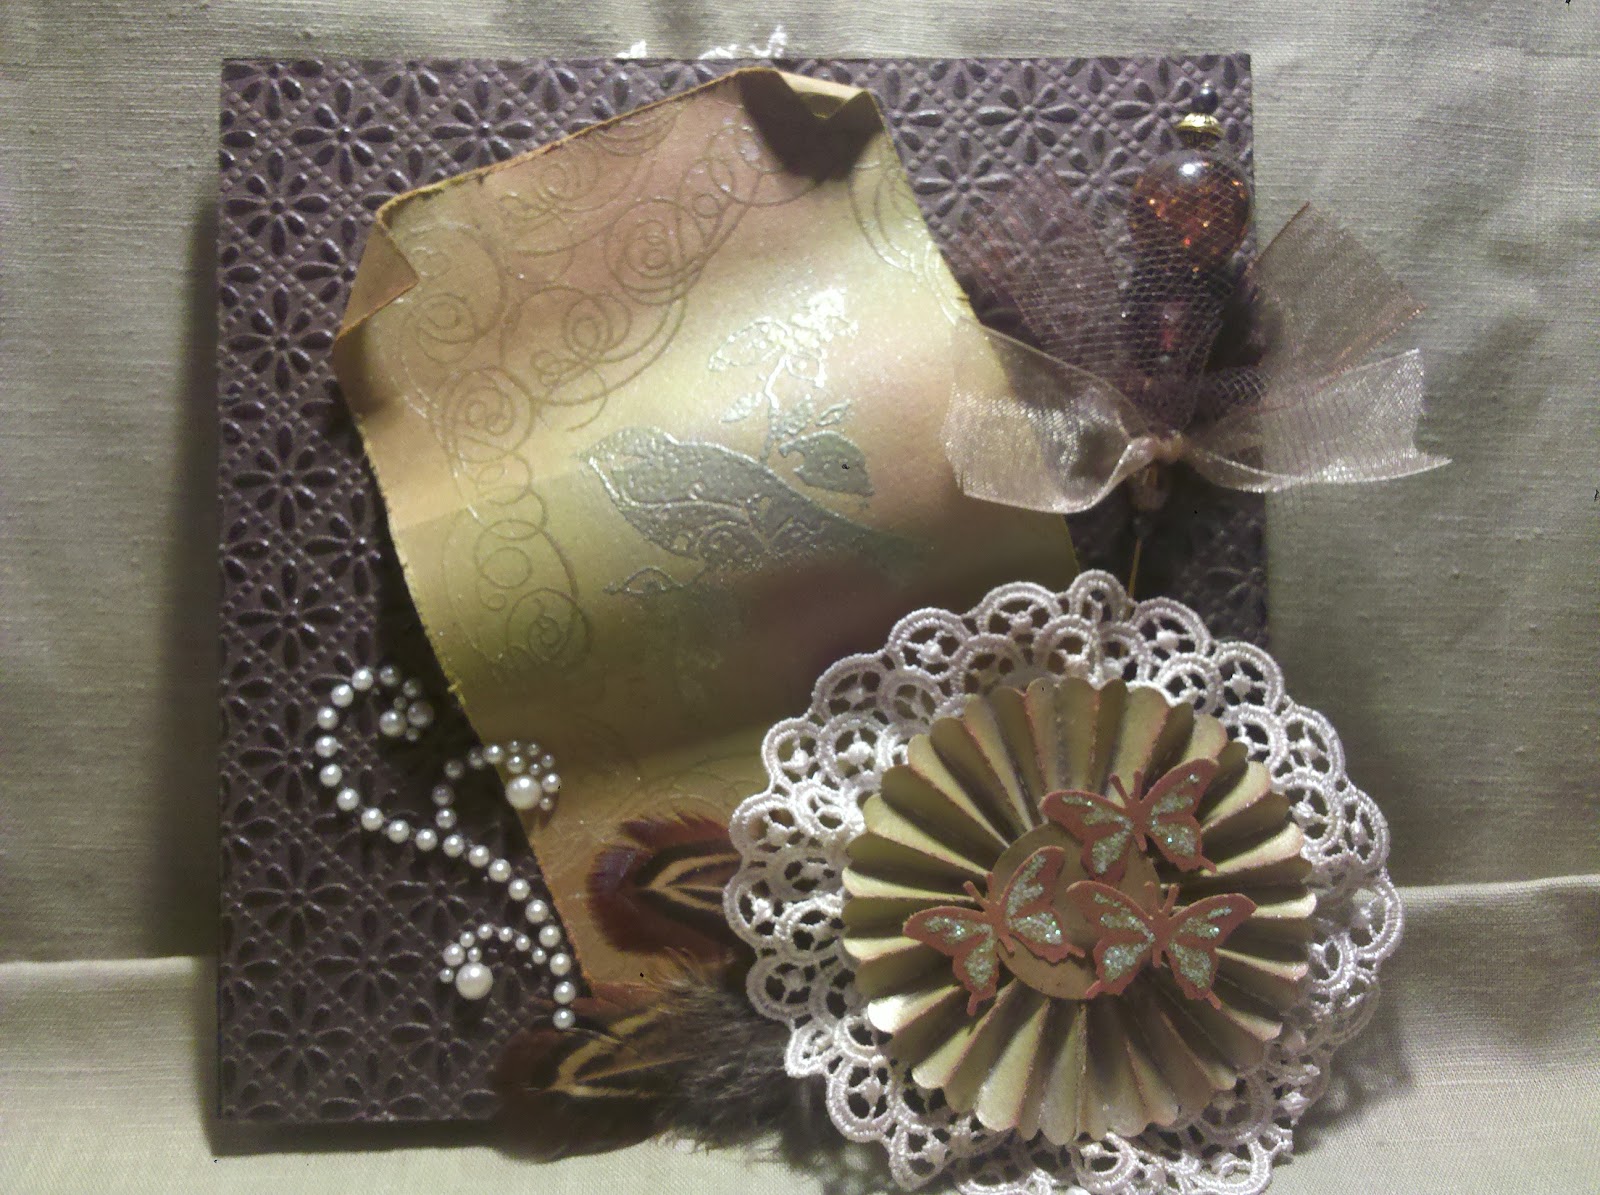
This one is for Martica at scrapbook.com. This is the front of the page. I used Inkadinkadoo stamps, pewter embossing powder by Hampton Art, prima lace, recollections pearl flourish, kraft cardstock, textured paper from Hobby Lobby, Tim Holtz Rosette die cut out(from happydales on the{scrap}beach), feathers, handmade stick pin, green and Burgundy pigment inks, Martha Stewart Butterfly punch
This is the back with the tag inserted with my information on it.
This is the back with the tag pulled out. Stamped and embossed the same bird on the back as the front. Used craft card stock again and textured paper from Hobby Lobby. The lace along the edge is self adhesive paper lace I had in my stash for a long time.
Here's the tag. Birds again and the text reads: Birds of a feather flock together. I used some pearls, more of the Prima lace and green pigment ink and topped with a Prima flower.
Here's the second one. It's for Alvie(laceykat on scrapbook.com). I used some flowers from the floral department at Hobby Lobby. I sprayed them with Mud spritz by Shimmerz. I used craft card stock for the journaling, some gold branches from one of the Making Memories vintage findings kits, a locket, music note punched from chipboard then covered with music note paper, Websters pages paper, die cut from one of the new K&Company packs and butterflies by the Paper Studio(hobby lobby).
Here's the back. I used more of the Websters Pages paper and the paper studio butterflies, flowers from the floral department, acetate and large butterfly by K&Company. I added the butterfly on top of the acetate and put stickles in some of the cut out areas. This created a pocked for the tag. The tag is from the $1bin tag pads at JoAnn.
Here's the page with the tag removed.
Here's the one I made for Monica.
I used purple card stock and embossed it with the Allegro folder. Then, I added White card stock that I embossed with the music notes stamp. I added a Prima vine on top of that and a large music note I got from the Christmas ornament section at Hobby Lobby. I also used the Martha Stewart butterfly punch on black paper with silver ink. I rubbed a little stickles on top of those as well.
This is the back of the page. I made the pocked to put my info inside of it. Used more of the same on the back, but added a chipboard music note, purple butterflies, recollections pearl flourish and a black flower I folded.
I used a tiny note card envie and tag to put inside with my information on. I added an eyelet, ribbon and music note charm. I hand wrote my name with a whit American Crafts marker.
So...those are my friendship pages I have completed so far. Thanks for taking a look. Have a wonderful day/night!
Today I was browsing the gallery at Scrapbook.com and I came across the cutest Halloween Mini. It linked me to Enchanting Creations website. I wanted to share it because there are some beautiful works of art at this website. It's an online magazine and they have some wonderful ideas for minis, cards, stamps and other items. Take time to visit and you will not be disappointed!!
I made this one with the pics already in it since its for a guy and I knew he wouldn't ever put the pics in it himself. It's for my brother and it's mainly photos of him and his son...my AWESOME nephew who is my favorite little man in the world. Hugs given freely, kisses too and no worries if I'm not perfect or an emotional girl...I'm still his Aunt Sheddy. He's the only male I know like that except my Dad. He can change my day and brighten it with one smile, hug or kiss. He's the best thing in my life. :-) Ok...now down to the mini.
I used so many products on this mini. I used the Bo Bunny DAD album, but I added my own pages to it as well to have more space for photos. I will list the products below the video. I hope you enjoy!
Products Used:
Bo Bunny Grease Monkey Papers and Stickers
Colorbok Epoxy Stickers
Blue Cardstock
Orange Cardstock
Washers - yep...from the hardware store
Wire Mesh(I think its by memory makers)
Glossy Accents
Matte Mod Podge
Screw Top Brads by The Paper Studio
Thin Chipboard
DAD album by Bo Bunny
Checkered Duct Tape
Mini Bottle Caps with Alpha Letters by The Paper Studio
Regular Size Bottle Caps
Green Zip Ties from the Dollar Tree
Blue Embossing Powder
Heat Gun
We R Memory Keepers Stamps
Lil Davis Stamps
Blue Saftey Pins
Tim Holtz Stamps
Jolees Boutiqe Daddy Sticker
Boy Themed Stickers by The Paper Studio
Epoxy Brads by The Paper Studio
Dimensionals
Deja Views Happy Banner
Toy Box Chipboards by Crate Paper
Hammer and other mini tools purchased at Hobby Lobby in the Miniatures section
Basic Grey Stamps
Tim Holtz Gears chipboard
Folk Art Blue Metallic Paint
Colorbok Star Shapes - Courtesy Susie Hatfield :-) Thanks Girl!
Star Button - Courtesy Tammy Thank you Tammy
Jillibean Soup Journaling Spot
White large tags by The Paper Studio
Inkadinkadoo stamp set
WHEW!!! What a list and I'm sure I forgot a few things. I am finally using up some of my stash and things that my generous friends have sent me. Thanks to all my crafty girls.
I need to get back to my 12X12 layouts, but the OWH(operation write home) cards have been taking a lot of time and oh yeah...working 20 hours of overtime last week. I am worn out. But, I still have a smile on my face and my job. Plus my cards for the Soldiers Angels program. Not long left before the Holdiay Card deadline. Hope some of you have thought about sending a card to a Hero or even better to multiple Heroes. :-)
I also started my Halloween Mini album. My Halloween STASH IS AMAZING thanks to my gals at Scrapbook.com! When I was member of the month for a swap they loaded me up with all kinds of goodies. I am so excited to use them up. I do think I could fill 3 minis if not more with all the products I have on hand. So, be on the lookout for that. I hope to finish within a week or so. OH and come see us at Scrapbook.com!
Thanks for stopping by and your comments are always welcome.
Well, today is World Card Making day and if you are a scrapbooker or paper crafter...why not try some cards to help out the wonderful Heroes that keep us safe everyday? That's right....you can make up cards to your hearts content and send them to Operation Write Home and they will go to deployed service members around the world. Then the Heroes choose a card from the box and use it to send back home to their family! You can visit Operation Write Home HERE. They are also having a blog hop today for World Card Making Day. You can visit the Operation Write Home Stars and Stamps blog HERE.
So...let's get crafting and make some cards for our Military service members!! They need to be reminded how much we care and appreciate their service.
I'm busy making cards myself for OWH but I also have been working on a Dad mini album for my brother. It's finally finished and I have to get my photos uploaded. Hopefully I can do the slideshow in the next couple of days.
Hey Y'all! I posted my link for the slideshow but forgot to set it as public. So sorry. If you want to see it still please watch and your comments are much appreciated.
If you need product information please see the original post HERE.
Now, down to the reason I came to post. Some of you may or may not have heard of an organization called Soldiers Angels. If you haven't and know someone who has been in the military or who is still in the military...I encourage you to visit the Soldiers Angels site HERE. This is a wonderful organization that I participate in and support and there are so many soldiers who still need care packages from US or even a CARD to know that we...here in the USA are still thinking of them and that they are appreciated for their service. Soldiers Angels has an Adopt a Soldier program for sending deployed soldiers care packages. If you cannot do that...a card does not cost much to send and if you can do more...that's great too. There's currently a Holiday Card Project going on and I know we as crafters love to make things. And for the people who are not so crafty...they even provide cards for you to download, add a message and send in. There's something we can all do to let our troops know that we still care and we haven't forgotten them. I hope you will all consider visiting the Soldiers Angels website to see what they are all about.
Hey y'all...FIRST of all I want to say thank you to all the people who have left me comments. I finally got a comment posted today on someone elses blog so maybe my blogger unable to post comments issues are over? Let's hope so. I still visit all of your blogs when I can and if blogger lets me...I will post a comment for you. I know we all love the comments from our crafty friends.
OK...this is my first mini with any Graphic 45 product and I have to say that I am so impressed by the papers. My aunt asked me for a mini after seeing the Guitar one and she told me she wanted one with Mythical creatures and Fairies...so immediately G45 came to mind and the Once Upon A Springtime collection.
She likes purple and green and not so much of a fan of pink...so I had to choose certain papers from the line to keep the pink to a minimum. I think I accomplished my goal. She loves the book. BUT, I am just now getting to updating my blog with the photos.
Here's the Front
If you'd like to see the rest of the book...here's a slideshow ...the inside is so much more yummy than the front cover.... Sorry!! Still no video camera. I promise one day. :-)
Here's a list of the products I used for this book
Tim Holtz Birdcage Die Shapes- Courtesy Lisa1968
Tim Holtz Dressform die shapes - Courtesy Lisa1968
Graphic 45 Once upon A Springtime Collection
Glossy Accents
Flat Back Pearls - Lavender
Recollections Pearl Swirls
Kaiser Craft Lamp Post
Inkadinkadoo Fairy Stamp
Prima Say it In Studs - Purple
Prima - Wings? lol
Watercolor Art - By Jessie Barber purchased from Etsy
Celebrate it Paper Bags 0 Small
Petaloo Blossoms
Prima Flowers
Recollections Butterflies - White, Gold
Lace - JoAnn's
Embellish It Ribbon
Cream Cardstock
Lavender Cardstock
Folk Art Metallic Purple Paint
Gemstone Brads
Stickles
Recollections Fairy Stamps
Prima North Country Stamp
Recollections Roses
Mini Roses from paperwishes.com
K&Co Die cuts
Recollections Purple Bling
Acetate
Websters Pages Green Lace
Martha Stewart Butterfly Punch
Tim Hotlz tiny paper clips
Tim Holtz embossing powder
Martha Stewart leafy Branch punch
Humming bird glittered rub on - purchased at Michaels
Fairy Charm - Hobby Lobby
Kaiser Craft Owl Stamp
Tim Holtz ornate on edge punch
Tim Holtz Distress Crackle - Rock Candy
Tim Holtz distress ink
Recollections Dimensionals
Large ivory flowers from Floral Department.
Floral Sprays from Briday department
Thank you so much for taking a look and any comments will be greatly appreciated. :-)
So, I'm really slacking on my blogging. Shame on me. Here are my latest 3 cards.
These are 3 thank you cards that I made for my cousin to give to some of her friends. I was really please with the way they turned out. Hope you enjoy and thanks for taking a look.
Hey Y'all! Here's my latest charms and list of products used.
Stickles - light blue color
White Tags by the Paper Studio
Craftsmart Brown Pigment Ink Pad
Martha Stewart light blue pigment ink
Martha Stewart dark blue pigment ink
Silver Chain
assorted gold beads
sea shells
assorted blue beads
small glass bottles purchased at hobby lobby
sand
glossy accents
Martha Stewart green pigment ink
Inkadinkadoo sea themed stamps
Hey y'all! So, I have been crafting my little heart away all weekend and here I am to share with all my crafty friends my latest creation. This is something I'm really proud of. I have been working on this for a while. It's a guitar shaped not so mini, mini...It's kind of big!! My cousin wanted something to put her lyrics in. She sings, writes songs and performs. So, I started this little book for her to place her treasured lyrics in. I said on my last post that I was going to do better at making a product list. I have to confess...I didn't do much better this time. :-) I will list below some of the things I used that I managed to remember. Please forgive my bad memory. I've placed a photo below and have a slideshow as well. Thank you for any feedback or comments! They are greatly appreciated. Without my crafts...I'd have nothing!
Product list:
Recollections bling pink and clear
Prima flowers, various shades, pinks, greens
paper studio flowers, black, pink polkadot
paper studio paper pad - girls like to rock
green tulle - hobby lobby
pink tulle - hobby lobby
rockstar paper pad dcwv
pink cardstock
black cardstock
green cardstock
yellow cardstock
black brads - darice - courtesy of Sally! Thank you
EK Success paper edger punch notebook
Martha Steward paper edger punch loops
Amanda Blu Square tiles, pink
Sticko Guitars Puffy Stickers
Inkadinkadoo stamp set
Donna Salazar Stamp
pink guitar picks(purchased on ebay)
pink zip ties - dollar store
Guitar shaped caribeaner(not sure how you spell that) - dollar store(3 in the pack!!)
Black shoot distress ink by Tim Holtz
Hitch Fasteners by Tim Holts
Extra Large Eyelets by ? (purchased at JoAnn in sewing section)
Colorbok Silver chipboard swirls
Pink dollar bin pigment ink from Michaels
Modge Podge
Pink adhesive back rhinestones by Darice (courtesy of Sally! thank you!)
Dress form chipboard piece by Tim Holtz (courtesy of Lisa1968 on YouTube)
DCWV silver envelopes
plain white envelopes
Music themed iron ons by Tulip
Websters pages silver link trim
KI Memories Border black glitter stickers
Making Memories Wedding flowers pack
Autumn Leaves license plate stamp set
black embossing powder by hampton art
Drums snag em stamps
Very large clothespin purchased at Micheals, not sure of brand
Blue chain - hobby lobby
various charms, music notes and jump rings
Black acrylic paint - folk art
pink acrylic paint - folk art
green acrylic paint - folk art
glossy accents
thermoweb adhesive runner
recollections red tape
Wow...that's a list!! I'm sure I have forgotten some things too. If you have any questions feel free to ask!!
Thanks again for taking a look.
Have a wonderful day!
Here's a mini I just finished this weekend for my friend ScrabookSusie at scarpbook.com
I've attached the slideshow below and the details are underneath the slide show. Thank you for looking!!
Susie didn't give me any restrictions on this mini. She told me her fav colors were purple and green and tye die...so I went with the purple and green. She also like vintage...so I tried to give some vintagey touches in these colors. I'm not sure I achieved it, but I tried!!
I used some chipboard for the covers and the inside is TP rolls. I cut them in to the shape using a template I made myself. This is the same template I used on a previous TPRoll Mini that Susie liked. I used Tim Holtz distress ink in dusty concord, latte mat stack from dcwv...I think?, some of my vintage lace, made some flowers out of my white vintage lace, Martha Stewart butterfly punch, green feathers from Micheals...got them on clearance, and Prima bucket flowers that I've had for a long time. I used Grommets from the sewing section for the hole reinforcers. Recollections bling that comes in the roll...love that stuff!! Some purple acrylic paint by folk art. I used that on the cover and back and painted all the TP Rolls. A lot of it doesn't even show, but I wanted it to be finished and no brown roll showing! I used some left over packaging and embossed it to create a couple pockets on 2 different pages and I also made some tags. I love this look!! I really like the way it turned out. I used a lot of different stamp sets...if you have a specific question about any of them let me know. I used a lot of $1 bin stamps, Autumn Leaves Stamp Set, one Martha Stewart set and one KaiserCraft set. I made a butterfly stick pin and added that to one of the flowers I made. I also used some Purple Glimmer mist...then it stopped spraying in the middle!! UGH...got so aggravated.
I am going to try and do better at making a list of supplies used. I hope you can make heads or tales out of this post...maybe you can. If not just look at the slide show!
Well, I have completed my next doggie dedicated mini. This one is for my princess Honey. Honey is a rescued dog. I got her and her sister when they were just pups. They had been found on the side of the road laying next to 2 of their dead siblings. When I heard their story and saw they cute little faces I could not let them go without a home for a day longer. I brought them home with me and they adapted quickly. Honey's sister...Freckles, sadly had bad health and we lost her. She had a wonderful home while she was alive and we enjoyed many walks together and playing in the back yard. BUT, this book is for Honey so...here goes.
I used the Bo Bunny DOG album and I added extra pages and kept the back board that came in the packaging to add more stability. I used all kinds of doggie themed ribbons on the rings that I bound the book with. I used the DCWV Pet stack, Around The Block papers that I got on a VERY good clearance sale and I also used some punch outs and papers from the Deja Views Dog Stack. I used some rubons that I purchased a good while ago from ABC Distributing. I got them while on clearance as well. I used glossy accents to highlight some of the rubons and some of the paws on the inside pages. I used some home made shimmery mists in blue and some flowers by the Paper Studio and Prima. I also found these great little journal spots at Big Lots. I used them a couple times in the book. I found some great paw prints brads too that I used for the centers in some of the flowers. I can't remember what brand they are. I found some glittery dog bones at Michaels as well. Sadly it was the last pack!! I also used my storybook Cricut Cartridge to cut out some letters and I used my EK Success paw print border punch. I used some bling from various lines and some Inkadinkadoo stamps that has the cutest little pooch!! I made some stick pins and added them in various places. Well, I guess that's about it. If you have any questions on any of the products I used and I didn't mention please feel free to ask or just comment!!
So, remember how I said I lost my usb cable? Well, finally...here are the pictures of my last card I made. My Aunt Wylene made me a quilt. So, I made her a card to say thanks.
Not much to explain with this one. I used some white card stock, a mat stack, an EK Success border punch, Some TINY Prima flowers I got in the large tube of colors they sell, a butterfly that I got at the dollar store(what a great find...pack of 3), some pink pigment ink, blue American crafts shimmery paper, Inkadinkadoo flourish stamp, Recollection bling, and the pink paper strip is from a old old mat stack I had laying around from Me and My Big Ideas. I also edged around the card with blue pigment ink. I stamped the words Thank You using the $1 bin stamps from Micheal's. I love these little alpha stamps!! They are the best. Every time I go in there I look for new sets. The shaped piece in the middle was a rectangle and I used my circle punch to cut off the edges and give it a more decorative look.
Had so much fun putting this together for her. She thought enough of me to make me a quilt and it really meant a lot to me.
short slide show I made for YouTube
Thanks for looking!! The weekend is coming and hopefully some more crafty goodness for me.
Wow!! I got this email today saying my blog was featured on Scrapbooklayoutideas.com. I have never heard of this site, but it says they get thousands of hits from all over the world.
Did you think I had disappeared? Well, I got the tooth business took care of and then I lost my usb cable for my camera and phone. I have searched everywhere for it. I also have been working a lot and FINALLY I'm able to share with you my latest work.
I started participating in a new swap for the month of June. The themes were Americana and Beach. I joined this swap on the {scrap}beach. Come on over if you'd like to visit!! It's a great group of scrappers and crafters. I have met some really great people there.
So, I created slide shows for the stick pins and I'm also posting a photo. Here's the Americana group.
I found some great beads at Hobby Lobby and got some online as well. The middle pin is a Maya Road Stick pin with a clear star on top. I thought these fit the Americana theme well. As for the pin on the left...I wished I had taken a photo of the top of the flower. It has the clear stick pin top in the middle of the flower and turned out really neat! I got the flower beads and the leaf from an eBay store a while ago. I thought the colors were great for this theme. The other one on the right side was made with beads from Hobby Lobby. I got these beads in the clearance section. Choose your beads, add some glue, let them dry and you have a really beautiful embellishment.
Here's the beach themed pins.
I had so much fun doing these pins. As soon as I signed up for the swap I had this idea in my head to use a little bucket and it took me forever to find these!!!! They actually had citronella candles in them and I just popped the candle out, but the bucket in half and then I added foam. I cut out a half circle. Covered it with glossy accents then sprinkled on my sand. Then, I added my umbrella in and it didn't fit that well so I cut half of it off the back. I added a few shells and stuck my pins in. I cut out my card stock and had to back them on some heavier chipboard so the weight of the bucket would be supported. I used grommets for the holes to run my ribbon through and tied a little bottle of sand on the ribbon and I stamped around the edge. I wanted to add a sun in the corner, but I didn't wanna add the yellow color to the board...so I just used a flourish stamp to go around the edges. Stuck my pins in and I was done!!
I hope everyone had a great weekend. Glad to ramble to you all again.
Okay...here's another charm for you...JoAnn(our hostess of the swap) needed another person to send in a charm to balance out the group. I had already used up my great rose beads on the other charms, but I figured I could use some connectors that look like roses and some more of my vintage lace. So, that's what I did. I used the backs of the cards that I cut for the first set. What a great use I got out of these!!! $1 for the pack and I got 10 uses out of them so far. I still have one whole card and the envies to use as well and the envies are craft paper envies. So much I can do with that!....maybe a mini? hmmm...
So here's the photo...short post today!!
Thanks for looking. I hope you have a wonderful day.
You may or may not know I have been battling with dentist to get a broken tooth taken care of. Well, the dreaded day of the oral surgery is set for Friday. I'm terrified of the dentist!! I guess it's also a happy day since after that I really shouldn't have anymore tooth pain. So, I wanted to go ahead and post my next 2 charms. I have to get them in the mail in the next couple days.
This one is for June
The theme was lace, love and roses. I found some great rose beads that are round with a flower carved in them. I made 2 stick pins and placed them behind a handmade flower. The tag is actually from a card that I cut up from the $1 bin at Michaels. I loved them, so I got one of every color. This one seemed to fit. Then I made a little lacey type flower on a jump ring and attached to my charms as well. I always don't know when to stop adding. For July I tried to back off a bit.
Here's an up close of the stick pins and handmade flower.
I also added a little to the card with some trim and leaves that are glittered. They used to be borders, but I cut them up to fit the way I wanted. This is more vintage lace that I used from my grandmothers stash. I have tons of it and I love it. It's the perfect size!!
Ok, here's the one for July
I already had it packaged up before I thought of taking photos. Sorry for the glare!! I used 2 different Tim Holtz stamps. I know it's hard to see one of them because of the package, but it's the kind of argyle pattern in one of the older stamp sets. Then I used the script background. The tag opens up and has my info inside. I loved this big circle metal bead type of a thing when I used it in my paper bag mini album. So, I thought I'd use these again. The theme for July is Vintage/Distressed. You can still join the July swap over on the scrap beach. Here's the LINK. It's a very fun swap and I am addicted. I held back on this one a little bit. I like to make junky charms I guess.
So, I probably won't be posting anything else until after the surgery. I have a few days off from work afterwards to get back to feeling normal again.
I have one more swap I am participating in but it's not due to be postal until the end of the month. So, next week, maybe I can get photos of that posted for you.
I hope you have a wonderful week!! Think of me on Friday and send good thoughts my way that I won't freak out at the dentist.
Hey Ya'll!! Hope everyone is doing well. I am having drama with a toothache and it's been going on since over a week ago. I was trying to just get through the pain. Then went to the dentist and the drama began!! I won't go in to detail because I'm here to share with you my latest project.
I am participating in another swap on Scrapbook.com. It's a matchbox swap. I wasn't really sure what I would do when I was asked to participate in the swap, but I'm always looking for something new to try so I decided to go for it.
The theme was music and I have to say...I've been very impressed by what the talented ladies in this swap have came up with! It could be general music or a theme such as Broadway, jazz...etc etc...I decided to keep it general and use one of my favorite quotes. I got this idea in my head pretty quickly...I just had to find the right items to make it look the way I pictured it. So, get ready for a lot of photos. I'm going to share them with you and if you have any questions...please feel free to ask. Your comments are appreciated.
Here's the box, the "drawer", the tag and flower I made as an extra. I painted the box with black acrylic paint. It was very sticky when I got done, so I coated it with some matte modge podge. I also used wooden feet on the bottom of the box and painted those black. The paper I used is from Basic Grey. The red bling is Forever in Time. The piano is from a collage sheet I purchased from B-Muse. I added some black lace, cream lace and black satin ribbon to the tag. The flowers are made from different items. The one on the top of the box is made from trim that I took apart and made in to a flower. I then cut out leaves from the collage sheet from B-Muse and added those. The other flowers on the box will be in the close up photos below.
On the piano...the text reads...When words fail...music speaks. I know it is very hard to see in the first photo, but I will add some more close ups below.
Here's a close up of the front of the tag. The flower on it is the same as the one on the top of the box. Just made out of some trim then red bling added to the center. Trim across the bottom and a charm added to the fibers/lace.
Here's the back of the tag and more bling at the bottom and a piece from the collage sheet from B-Muse. It is open at the top and has another tag stuck in behind with my information located on the back. I used scraps and black ink on this tag to cover the front. The top of the tag has black ribbon and a music note clip with 3 charms/dangles attached.
The flower is made from more trim and lace. I then added a button to the middle and attached a dangle/charm to the center with ribbon.
Here's a closer look at the front of the "drawer" I added a music clip to the front for the pull and it has a small charm on it. I struggled with this part of the box. I couldn't get it the way I wanted and after I had already punched a large hole in the box...I had to make it work. I think it came out ok. I added a large grommet from the sewing section and placed a button on the back side to hold the clip in the hole.
Here's a few more photos....
Here's the slide show...enjoy!!
Thanks for taking a peek! Have a wonderful weekend.
Hello! I am a very passionate crafter who loves Music, Animals and my family. I love the outdoors as well and taking photos of things in nature. I have a nephew that is a favorite subject of mine to scrapbook as well as 4 dogs. I hope to share ideas with you here on scrapbooking and card making and other ways I express my creativity. I will also share some of the products I use when scrapbooking and of course I will share deals with you. I never pay full price for anything!! I also hope to make many new friends.