Saturday, June 22, 2013

Mother's Day and Father's Day...a tad LATE!!

Hey Y'all!!

In catching you up....in case you missed it on YouTube...My Mother's Day and Father's Day Cards!

I made videos and took still shots!  Yay for me this time.  :)

For my Mother's Day card...I wanted something country and beautiful.  So, I pulled out my Graphic 45 French Country paper that I got from Blitsy.  I didn't think this was going to be one of my favs of Graphic 45, but when it got here...I was sad I only ordered a few sheets.  This paper is beautiful and how could I doubt that Graphic 45 would make something less that amazing.  :)

So, I went with it!!  I also used some extra items, like seam binding, My Favorite Things Flourish die, rose buds, sunflowers, burlap, and black card stock.  I explain my process in the video below.

Here's the video...


Here's the still shot...


Now, my Father's Day Cards...

My brother asked me to make him one to give our dad as well.   So, CHALLENGE...to come up with 2 masculine cards.

For the first card, I had a card kit that has been in my stash for a VERY long time.  I recently saw the pack at a Tuesday Morning store though.  It made me think...I need to get that out and use it.  So, I pulled it out and a lot of the card bases and embellishments looked more like girly items.  So, I had to rethink it a little.  They ended up looking kinda plain to me.  BUT, my Dad is always happy with whatever I make him.  He says that my handmade item is much better than store bought.  The second card, I used an embossing folder and a stamped image.  I also pulled out my blast from the past Creative Memories oval cutter!!

So here's the video on both cards...it looks like bad quality for some reason!!  BUT same camera...


Here are the still photos...loving instagram!!


Thank you so much for stopping my my poor neglected blog.

Have a great weekend!!

Thursday, June 20, 2013

My little ATC Holder and First 3 ATC's

Hey Y'all!!!  

Here's a little project I created and got inspiration from several ladies on YouTube.  Please check out the video and let me know if you have any questions.   There's also a video with my first 3 ATC's where I explain products I used :) 


PS - I'm trying to catch my blog up to the items I've posted while the give away was going on.  Lots of stuff posted on my YouTube channel!

Thanks for visiting!

Monday, May 6, 2013

My giveaway to say THANK YOU! - Now Closed

***Update***  This give away is now closed and the winners announced!


OK...so on my YouTube channel I have been promising a giveaway for a while now.  I finally have it together and am ready to start.


Give Away Rules

Prize 1
Must Be a subscriber to my channel/blog follower

leave a comment on the video for 1 entry
leave a comment on my blog for 1 entry

Prize 2
Must Be a subscriber to my channel/blog follower

make a video or slide show promoting my YouTube channel/blog and giveaway for 1 entry
make a blog post on your blog promoting my YouTube channel/blog and giveaway for 1 entry

Prize 3
Make something!!
Must Be a subscriber to my channel/blog follower

Make anything you like.  Tag, atc, mini, canvas, art journal page...anything!!

Do a video response and post on your YouTube channel - pm me to make sure I know to add your entry - for 1 entry

add your project to your blog and title it shellyanne00's giveaway on YouTube email me directly to let me know you did a blog post shelly_anne00@yahoo.com or pm me on YouTube - for 1 entry

If you enter for all 3 prizes...I will give you an extra entry for each prize. :)

my blog is www.basementcrafts.blogspot.com
my YouTube is shellyanne00

if you have any problems please email me directly - shelly_anne00@yahoo.com


THIS IS OPEN TO MY INTERNATIONAL SUBBIES AND FOLLOWERS.

Thank you so much for your support and continuing to stick by me in the past year.  I haven't been around as much and to have you all stick around means a lot.  :)

Have a great day and craft away!!


Friday, April 12, 2013

My Distress Ink Holder - DIY!

Hey y'all!!

Here's my video to my distress ink holder. I finished it a while ago so I've had the chance to use it every time I craft and I love it!!!  It makes it so much easier to use my inks.  I normally like everything put away and neat and tidy.  Well, when I do that I don't see everything.  So, I tend not to use it.  That's the reason I have done this rotating storage for my inks and the rolodex I am still working on.

It's very easy to do and I explain a bit in the video, but if you have any questions please let me know!  I'd be glad to do a tutorial or answer any questions you have.  This is a great and inexpensive way to organize your inks.  You don't have to stack them the way I did. You can stack any way you'd like.  There are many options.

Here's the video for the distress ink Holder.


Here's the video to the rolodex....not completed, but you can get the idea.


Thursday, April 11, 2013

New Art Journal Page

Hey Y'all!  Yesterday I posted a video to my new art journal page.  I totally forgot to come over here to my poor neglected blog to add the video.

I finally got my new camera so I will be doing lots more videos and hopefully some tutorials. 

So here's my page!!  

I showed everything I used in the video, but if you have any questions please feel free to ask.


Thanks for visiting

Have a great day!

Thursday, April 4, 2013

Giveaway UPDATE and new Art Journal Page!!

Hey Y'all!  Just wanted to give a quick update on the giveaway I mentioned in my last post and last video if you watched.  I decided after posting the video I wanted to wait until I got a new camera so you can actually see what I am giving away.  The camera I have now is basically crappy and I just ordered a new one this week.  I'm hoping I get it by early next week.  I am attaching the video below of the art journal page and there's a bit of info in the video about the giveaway, but here's a little more.

I want to share with you who have continued to follow me through the hectic year I've had.  So, I'm going to share some of my NEW favorites and some of my OLD favorites.

Some new favorites are the Prima Engraver line.  I have a 6x6 pad to give away and some of the metal embellishments from their latest CHA release.  Another NEW favorite for me is the Gelatos!!  I have some metallic ones to share with you.  The gold and silver pack and the white and black pack. Another NEW favorite for me is the sand it gadget by Core'dinations.  This thing is FAB!!  I hope to be able to send a long some of the Core'dinations paper as well, but I'm not sure I can get my hands on any of the smaller pads.  AND of course...some of my NEW favorites are from Tim Holtz!!!  Some of his new items are just amazing.

Some of my old favorites are Glossy Accents, distress inks, smooch accent inks, Lindy's Stamp Gang sprays, Super Fine Detail embossing powders...hmmm...this giveaway is sounding VERY LARGE!!

I will share all of the items once I get my camera and all the items together.  Hopefully in the next few weeks.  SO...STAY TUNED!!

Also...Keep in mind when I say NEW favorites...doesn't necessarily mean it's all NEW release, but that it's NEW to me.

Here's the video of the latest art journal page...


Thanks so much for hanging in there with me!!


Tuesday, March 19, 2013

My First Art Journal!

Hey Y'all!

I'm very excited to share with you today my first art Journal.  I explain in a video below that I never thought I would be in to Art Journals.  But, this is something I've come to enjoy very much.  I did a little bit of explaining in the video, but if you would like to know anything I do not explain in the video...please let me know.

Comments, thoughts, critiques are very much appreciated.  Thank you so much for watching and going through my first stepped toward Mixed Media art.

Have a wonderful day/night...whatever it may be wherever you are.  :)


Friday, March 15, 2013

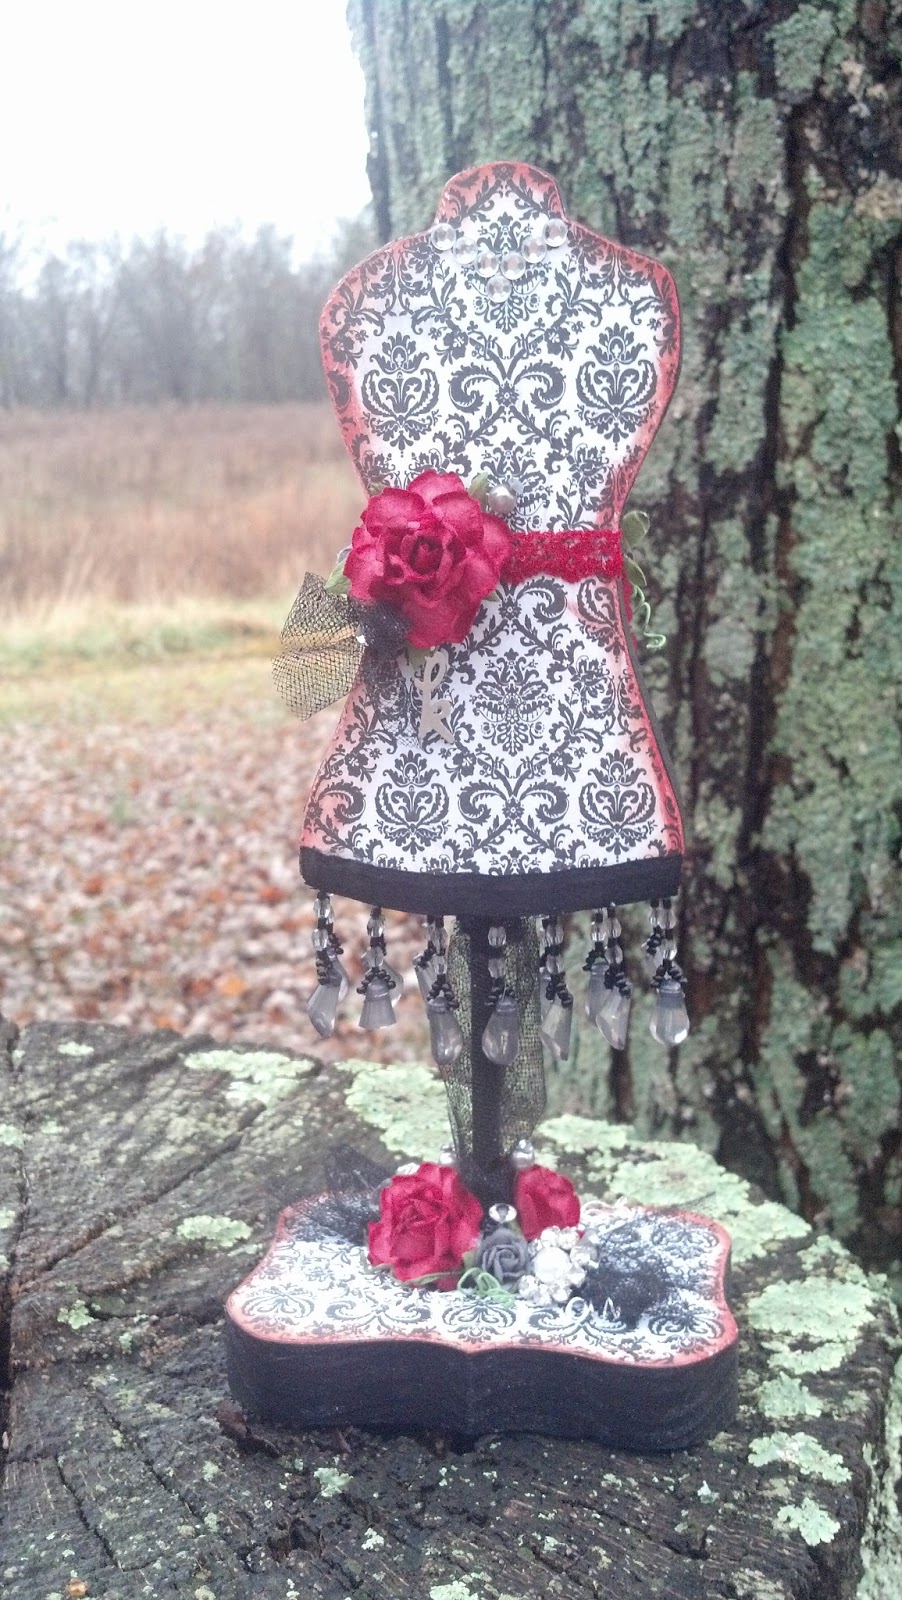
Altered Dress Form for Kelly

Hey Y'all!!  Everybody having rays of sunshine today??  Well, I hope if you are not that things brighten up soon!!

So, I am really late on posting this.  It was made for my friend Kelly.  Her birthday was in JUNE!  OMG!  How horrible is that??  BUT, I hadn't got to hang out with her in a while, so I finally finished it up right before having lunch with her a couple months ago.  Now...I'm just posting.  

Here's the finished project.  I don't have a list of supplies but if you have any questions just let me know.  Thanks for taking a look!!


Monday, March 4, 2013

Hey Y'all!  Finally back with another post.  I have been crafting but blogging has just been neglected.  I do try to post everything on youtube but don't always make it there either.  I always try to post pics on scrapbook.com too but guess what??  I forget to take pics if I do a video.  So, it's just crazy. 

Today I want to share the video only of an altered letter I completed for my friend Dawn.  It's been done a while, but I had to wait until I mailed it and she received it to post.

So, here's the vid!!

Thank you so much for watching!!

Monday, November 19, 2012

Friendship page for Dawn

Hey Y'all! 

Here's another friendship page that I made.  It's for my friend Dawn.  She's a great lady and likes steampunky style.  So, I used some of my HOARDED Graphic 45 Steampunk paper.  It was HARD!  But, a little easier to let it go since it was for such a great friend. 

Here's the front of the page


I decided to add some hot air balloons!  I love them.  I used a stamp set by Kaisercraft called Up, Up and Away.  I used some Blue Patina Ranger Perfect pearls and stamped the balloons.  Then I crackled painted them with clear rock candy.  Then, I finally added a layer of glossy accents.  You can see the crackle, shimmer and shine!  It turned out great!  I then used a chipboard piece from the Prima Romance Novel collection that says Friendship.  I crackle painted over it too and it started to flake off...so I used glossy accents over it as well.  I then covered a 6X6 piece of Black chipboard with my red line adhesive...purchased from Jody HERE.  Then I used my We R Memory Keepers Sew Easy tool and stitched using the straight stitch head all the way around my paper that I also cut down to 6X6.  I added my die cut piece from the Frames paper from the collection, then added some hand dyed seam binding sent to me by my lovely friend Ronda.  You can visit her YouTube channel HERE.  Before I adhered the bow in the corner, I stamped some wings from a Stampendous stamp set using Red perfect pearls.  They are very shimmery!!  Then when the balloons and friendship pieces were dry, I placed them on the page as well.  I added metal gears purchased from Micheals in the beading section and a few tiny watch parts in the lady's hair, a metal flower by Tim Holtz and then added a tealish flower on top.  I inked it then I coated it with Distress Crackle paint and let it dry.  I added a little more stitching beside the friendship chipboard piece as well and a prima light bulb.  I just scratched off the word that was on the bulb since it did not fit with my page theme.

Here's a few close ups of the front

   
For the back I was inspired by a Steampunk ATC I saw over at Scrapbook.com.  It was created by karenliz and you can link to the original HERE.  She has some wonderful artwork in her gallery! 

So, here is the back of the page

 
I took inspiration from another one of my favorite ladies...Natasha.  She is truly AMAZING!!  She uses a lacing technique like nobodies business and stitching too!  You can see just one of her truely amazing creations HERE where she used the lacing technique, but she has many many more.  Please take a peek in her gallery and visit her blog HERE. She now has a shop with some of her favorite products available! 
 
Anyway...back to focus...I used the lacing technique inspired by Natasha, but I wanted it to be messy.  So, messy it is!  I did use some tiny eyelets and used some of the same brown floss that I used on the front to stitch with.  I did another flower with distress crackle paint in rock candy.  I stamped the wings from my Tim Holtz stamp set and first try was Lindy's embossing powder, but it was way too light...so I used some Bronze by Ranger.  Then I made the little envelope to tuck in a note and my information.  Added some more gears and that was that on the back.
 
Here's some close ups
 
 
Thanks for taking a look!!  Hope you all have a wonderful Thanksgiving holiday!

Wednesday, October 31, 2012

True Blood Configuration box


Hey Y'all....

I'm still working on my distress ink holder, but I decided I'd share with your my last project.  I was holding off until the recipient of the project received it. 

Here's a pic of the entire box


So, it's a True Blood Configuration Box!!  :)  Eric Northman is the subject and I vamped this box up! 

I did a video explaining everything that I used in the box.  I will link it below, but here's a list of what I used.

Elmer's glue
black paint
red paint
red feathers
black feathers
white feathers
clock necklace charm
momenta clock piece
clock charm
celebrate it black flicker battery operated candles
red mesh bling
gray card stock
silver beaded trim
red chipboard letters
gray resin roses
red metal roses
acrylic sealer
clay (true blood bottle, gargoyle/bat, heart with wings)
Fleur De Li charm
red box pleated trim
red lace
coffin necklace piece
handcuff charms
black mesh recycled packaging
fang necklace piece
black tulle
silver chain
white chain
Recollections mini roses
Metal Corners from Wild Orchid Crafts
Mesh sheets by Making Memories
Tim Holtz game piece
Blue Moon Beads Moon Charm
Acetate
Mini White Roses from Paper Wishes
Thickers - Glittered Black
Thickers - Linen Fabric Gray
Tim Holtz Pin nib
Shrinky Dinks
Red Zipper


WOOOO....that was a lot.  So, here's more photos


I had a really good time making this box.  It was lengthy, but it was mostly due to the limited time I have to craft.  This was my first configuration box and I have to say...after this one...I see many more in my future!  It was a blast, not to mention it was for one of my friends...Monica(scrappin4myboys)!!  Go over and check her blog out...she is a talented chick! She also has a youtube channel.  You can visit her channel HERE

Here's my video for an explanation of what I did creating this beauty...


Thank you for taking a look at my creation!  I am proud of this one.  :)

Have a wonderful day and may the sun be shining where you are. 

Wednesday, October 24, 2012

Another work In Progress

Hey Y'all!!  Here's the other item I've been working on.

A spinner for my distress inks!!!

I saw a great idea on Youtube by Ozegran...you can link to her Channel HERE.  She has a great tutorial on her blog and put together a little video on Youtube as well.  Click HERE for her blog.  You can click HERE for her Youtube video. 

So I adapted what she did a little.  I have all these boxes laying around that I have saved.  You might have some too!!  Do you ever get those little packets of sugar free mix to add to your water?  Well I sure do because I HATE water alone.  So, that's what I used to make the base of my distress ink holder.  I flatened them out and cut them down to the size I needed(about 3 inches).  These 2 brands of mixes...Wylers and Hawaiian Punch were the same size.  The packets I had bought at Walmart with their brand was not wide enough for the distress pads to fit inside.  This is why I went for these 2 brands of recycled packaging.  You may try others, but those are the 3 boxes I had.  I have been keeping these forever!!  So, I had well over 20 of the 3 brands to chose from.

Here's a pic...


After I cut them down, I folded the flaps back up and taped them. After that was done...I painted them with Black acrylic paint.  You can chose a color to match whatever paper you like. 

After I was finished and I let them dry, I stacked them on top of each other and glued together.  I repainted in all the areas that were showing the pattern on the boxes.  Then the bare side of the boxes that showed I also painted the edges.  After those were dry...I added chipboard over them and added the patterned paper to coordinate with my other altered items in my craft room. 

So, here's where I am at so far...


So far I am loving this!!  I didn't get it perfectly straight when I taped my boxes together, but when I add my embellishments, it will be GREAT and don't think it will be that noticeable.  The only thing I wish I had done was to add a piece of thin chipboard between each layer.  That would have made it easier to align and added some strength between layers. 

So, this is my adapted version.  It has been quick!  You could probably do it in one afternoon if you could devote an afternoon to it.  I wasn't able to do that.  You can customize this to hold however many pads you have.  Myself, I have less than 20 right now...so I made mine to hold 20.  I am going to use re-moveable tape on the top to be able to add more.  Also remember if you want to do that to keep some of your paper for covering if you want it to match!  I'm also thinking of adding something on the top to store my alchol inks and stickles.  I just haven't decided completely yet.  I wanted to decorate the top of COURSE!  Will see what I can come up with. 

Thank you for looking and any comments are appreciated! 

Tuesday, October 23, 2012

What I've been up to...

So, I've been busy.  Crafting when I can.  I just finished a Configuration Box and I'll share that it detail whenever my Internet cooperates and I get the video uploaded. 

Here's another thing I'm working on...so just sharing my progress on this.

My favorite colors are Red, Black, White/Ivory/Cream and Silver.  I have decorated my craft room in these colors.  A while ago I altered my ATG stand.  The pink gun kinda stood out like a sore thumb so I decided to alter it as well.  IT is a WORK IN PROGRESS.  FOR SURE! 

Here's what I have so far.


I painted the back of the gun with acrylic paint.  Then I realized how easily this was gonna scratch off.  I ran over it with a black sharpie and it covered well.  Then I decided to seal it with acrylic spray on sealer.  This has worked well, but if you decide to do this, I don't think I'd recommend this method.  When I lay my gun down on the black side, it tends to take the shine off the sealer part.  If that makes sense!  If anyone has suggestions on how to alter your ATG without it scratching off so easily please post!!


Next...i added alcohol ink on the inside.  I went with Silver.  I thought if it covered better, I could recover the outside, but this scratched off as well.  Not as easily, but still scratched...So, I just did the silver on the inside then decided I'd cover the clear side with paper to Tie in the RED in my room.  :)  I added a piece of scrap paper from my stash and used some of the same black and cream paper that I used on my ATG Stand.  I'm not finished with it.  I even thought about adding some clear rubber stopper type things on the black side so when I lay it down it won't take the shine off.  I do have a stand, but I craft upstairs and downstairs a lot.  Maybe I need 2 stands!! 

Any suggestions from anyone please let me know!!! 

Monday, October 15, 2012

Altered Letter "S" for a friend

Hey Y'all!!  So...looking like I am gonna average about one blog post a month!  That is just sad, but anyway...

Here's my latest project.  It's an altered "S" that I made for a friend.  I haven't mailed this to her yet, so if she sees it I guess the surprise is ruined.  HAHA!!

I got the S from the Dollar Spot at Micheals.  I'm not sure if it was more than $1.  It's been so long ago that I bought it.

The letter was silver and I painted it purple.


I then added some purple paper over the top of the S to add some texture.  The purples were a little different in shade, so I painted over the paper as well.
 
 
After letting it dry I added my embellishments
 
 
I used Zva Creative pearl flourishes, a white I Am Roses flower, 3 green recollections roses, 2 Metal corners by Wild Orchid Crafts, Misc beads from my stash, an acrylic butterfly from the Micheals $1 spot and 2 Wild Orchid Crafts rosebuds. 
 
Here's a few close ups


Simple and quick project that took me about 2 weeks to complete!  HAHA!  I am sure you could do it much faster.  :) 
 
Thank you for taking a look and any comments are appreciated.

Monday, September 17, 2012

Baby Girl Mini

Hey Y'all!!  Well, as I told you before my crafting time has been severely limited.  So, I wanted to share a project that I completed a while ago and never shared.  Unfortunately, the video for this is on my DEAD iPhone so all I have is a photo of the front.  It's a mini album that I made for my friend Jennifer and her baby girl Ari. 

I kept it very girl and went with pinks and browns. 

Here is the front of the mini


I used some pink hounds tooth paper I got at Hobby Lobby by the paper studio.  Recollections mini roses, the big white flower is by Prima and the two on either side of it are I Am Roses.  I colored them with Coco Bean Copper spray by Lindy's Stamp Gang.  I added a doily underneath those and some brown multi-tone wheat sprays.  Next to the brown flowers on the end I added some ribbon flowers that have a tiny bling in the center.  I distressed the edges with a brown ink by Inkadinkado.  I added the Princess Die cut by My Minds Eye and backed it on brown card stock and used the Martha Stewart Punch around it.  I then added the Bow in the corner that is an ivory color.  I used the Stack the Deck binding method created by Laura Denison and you can go to YouTube and search for Stack the Deck and you can find her great tutorial on this binding.  I think it is my favorite out of all the binding methods out there!  It makes the mini lay flat even if you add dimensional embellishments.  You just kinda have to plan ahead.  I used the same papers throughout this mini with a few different patterns.  Maybe I can get my iPhone to LIVE again and be able to share the video with you.

As always...thanks for taking a look.  I am working on a True Blood Themed Project right now.  It's just taking a while to complete. 

Have a great day!!

Monday, July 23, 2012

Quick Masculine Card

Hey Y'all!!!

Well...I have been destashing away at my crafty stuff.  If you sub to me on youtube go on over and see what I have available if you are in need of anything crafty.  I have beads, rubons, stamps...and adding new things when I can.

But, I  managed to make a quick card the other night.  I had intentions of this card being for my dad.  Then I realized I was either WAAAYYY early for his birthday or WAAAYYYY late!!   Since it's in March.  Then I happen to remember a guy that has a birthday coming up on Friday.  I hate for the card to just sit!  So, I packaged it up to send out to him.

Here it is


I used a stamp set by TPC Studio that I purchased at JoAnn.  I used a button from my stash.  The photo shows the color of the button off a little!  Then I used craft cardstock and cut out the stamped image with a spellbinders die.  I used cream cardstock and the woodgrain Tim Holtz texture fade embossing folder.  Then I rubbed vintage photo distress ink over the raised areas of the embossing.  Tied twine through the button and stretched it out.  Attached to the craft cardstock card base and I was done!!  Super fast cute easy manly card.  :)

Thanks so much for stopping by!!

Tuesday, July 10, 2012

MIA!!!

Hey Y'all!!!  Well, if you haven't noticed, I've been Missing from my dear blog for a while.  My mother has been having lots of health issues so my scrappy and crafty time has become severely limited.  I did manage to upload a recent haul video and a video of my Halloween Mini on YouTube!!  I'm going to share a link to my YouTube channel because I rambled in my Halloween Mini videos and had to do a 3 parter!!  But below you will find the direct link to my Scrap-Mart Haul video.  :)

http://www.youtube.com/user/shellyanne00?feature=guide

WOW!  Feels like a great accomplishment with everything going on lately.

So, I thought I would jump over here and share those with you.  I have a few projects I'm STILL working on but if you thought I was SLOW before...well, now it's even worse.  Time will allow things to get better though.  Thanks for sticking with me!

Here's my GREAT haul from Scrap-Mart.  My first Lindy's Products!  YAY!

Wednesday, May 30, 2012

Another Card

Hey Y'all!!

Here's the second card I made for Mother's Day.  I know I know...I am way behind in posting.  But, hey...better late than never!  at least the cards were not late getting to the people I made them for.  :)


I used my Spellbinders dies(Fancy Tags 3 & Donna Salazar Rose Creations), Martha Stewart Butterfly punches(Monarch & Stamp and Punch Butterfly), some vintage lace, some very old paper from my stash(Around the Block and Bazzill), an EK Success Edger punch(double crochet lace), Faded Jeans Distress Ink and a Quickutz flourish die.  I thought it turned out pretty great and I was pleased.  I decided all my Mother's Day cards were gonna be easel cards and I must  say...I really like these cards.  They stand up so well on their own to display the front of the card beautifully. 

Thanks for taking a look!!  Here's some more photos of the card.


Thursday, May 24, 2012

PRIZES!!!

Hey Y'all!!

Do you want to win some stuff?!?!  Who doesn't?!?!  Well, my lovely and wonderful friend Susie is giving away lots of goodies on her blog.  She has an Adhesvise Prize Pack, Tim Holtz Prize Pack and a Sizzix Prize Pack!!!  You can click HERE to visit her! 

Please go over and check out her blog for the fabulous prizes and instructions for entering the drawing.

I will be posting my other Mothers Day cards soon!!  I hope!  I am a little behind. 

Everyone have a wonderful weekend!!

Monday, May 14, 2012

Mother's Day Card

Hey Y'all!

So, when I sat down to write this post...I realized...I should have posted these BEFORE Mother's Day. BUT, oh well!!  I'll be sharing 3 with you that I created this year.  I decided to try and make an easel card.  I have to say.  REALLY simple and there are some great tutorials on YouTube if you'd like to try it.  Just search for Easel Card Tutorial.  If anyone would like...I can make a short one.  I didn't do exact measuring this time of course!

So here's my first card.


I used Graphic 45 Once Upon A Springtime papers.  I had these scraps left over from the fairy mini I made.  Then I used some amazing trim, but I'm not sure where I got it.  :(  I also used some rose buds and mini roses from I Am Roses.  I used brown inkadinkadoo pigment ink for distressing and some pop dots for dimension.  The butterflies are an older Martha Stewart punch and I put diamond stickles on the top.  I also used some ivory colored card stock on the inside for space to write the message in the card. 

Thanks for taking a look!!